无论我们使用何种开发语言,实现UI交互时,创建自定义组件都是不可缺少的步骤。
首先为什么要创建自定义组件,通常会考虑到以下因素:
- 很多模块有相似的业务,相似的交互
- 避免重复的工作,一劳永逸减少工作量
- 让项目模块化更加清晰,各个模块引用的更有条理
好在微信小程序中也有创建自定义组件的功能。所以这次要说说在微信小程序中是怎么创建自定义组件的。
1. 首先我创建了一个Component

2. 配置组件的自定义属性 index.js
Component({
  /**
   * 组件的属性列表
   */
  properties: {
    item: {
      type: "Object",
      value: {}
    }
  },

  /**
   * 组件的初始数据
   */
  data: {

  },

  /**
   * 组件的方法列表
   */
  methods: {

  }
})
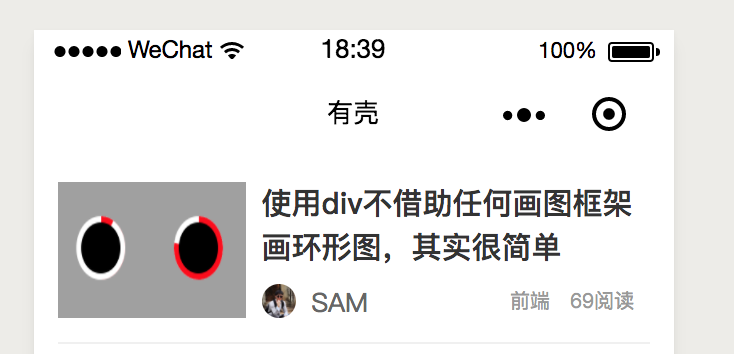
3.自定义组件页面index.wxml
<view class='note-li'>
  <image wx:if="{{item.briefPic}}" class='picture' src="{{item.briefPic}}"></image>
  <view>
    <text class='title'>{{item.title}}</text>
    <view class='user'>
      <image class='avatar' src="{{item.photo}}"></image>
      <label class="nickname">{{item.authorNickName}}</label>
      <view class='tip'>
        <text wx:if="{{item.featureTitle}}" class='feature'>{{item.featureTitle}}</text>
        <text>{{item.read}}阅读</text>
      </view>
    </view>
  </view>
</view>
4.配置文件指明该模块是个组件index.json
{
  "component": true,
  "usingComponents": {}
}
5.然后再要引用该组件的页面的json文件定义好该组件
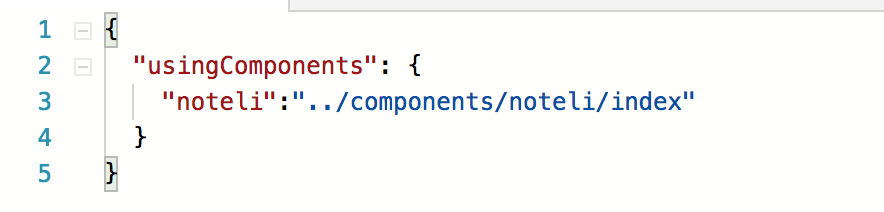
6.使用的时候传入参数就可以正常显示
<noteli item="{{item}}"></noteli>